

...and eat them both together. You put the lime in the coconut and then you feel better...
Was anyone else humming this (okay, maybe singing) when they baked these cookies?
This week's Coconut Butter Thins were chosen by Jayne, of The Barefoot Kitchen Witch. The cookie name is a little bit deceiving, in my humble opinion. I was expecting a coconut flavored cookie, but what the recipe makes is a crumbly, buttery shortbread cookie, studded with chopped nuts and lime zest. I couldn't taste the coconut as much as I wanted to.
The recipe calls for macadamia nuts, but they were about $9/lb at my local grocery store! The salted cashews were 25% off, so I went with those. I also rubbed the lime zest into my sugar to increase the lime flavor.
I have to say, overall, these aren't my favorite. I think I made a very important discovery last night: I'm not a fan of shortbread. I just don't like it all that much. Okay, maybe one piece with a cup of tea every now and then, but it's not my cookie of choice. Something about the buttery crumbley-ness just leaves me really unsatisfied. I want a cookie with more, I don't know....heft, maybe? More to chew than rather have it just fall apart in your mouth.
Overall, I liked the way these smelled while baking and I'm glad the flavor of the lime came through. I will get around to putting up pictures later, but they pretty much look exactly the same as everyone elses! Check them out here. If you're a fan of shortbread, then I think you'll really like these cookies. Visit Jayne's blog for the recipe and put the lime in the coconut...
March 31, 2009
TWD: You Put the Lime in the Coconut...
March 25, 2009
Operation Baking GALS - Round 7!
 Hey Blog Readers!
March 24, 2009
No TWD for me
Sorry friends. This endo medication has been totally kicking my butt and leaving me really fatigued and nauseous at the end of the day, and the last thing I want to do is bake. It's actually really sad for me!
Please visit the other TWD bakers to check out the delicious looking Blueberry Crumb Cake.
March 18, 2009
Winning isn't everything...
...but it feels awesome when it happens!!
In my lifespan as a blogger, I've entered dozens of blog giveaways. I always figured it was in vain, but I kept trying. It was free and hey, someone has to win, right?
Well, finally I WON the most super-awesome prize ever. Carolina, over at Gabes Baby Momma (great name!) picked my name and I get the most adorable set of cookie cutters and a bright red cookie spatula from Williams Sonoma. How did she know that this would match my red kitchen? She's a total genuis. I love her blog and her photographs, too. I can't wait to get my new edge-of-the-cup cookie cutters and bake some great cookies.
Thanks, Carolina! You rock my world!
March 17, 2009
TWD: Lemon Rosemary French Yogurt Cake

This delicious Dorie recipe was chosen by the lovely Liliana of My Cookbook Addiction. The French Yogurt Cake (with marmalade glaze) is a common staple in French households, according to Dorie. And after the first bite, I could see why! It's lemony, moist (I still hate that word), refreshing and sweet without being too heavy, and with a great texture. It's very similar to a pound cake but without a hint of butter. Dorie lists the Rivera version in her "playing around" section and I was drawn to the idea of trying fresh rosemary, Greek yogurt and olive oil in the cake.
I loved the way the rosemary complimented the lemon flavor with a slight background taste of herby-freshness. I think next time, and there will be a next time, I will use a stronger olive oil to get more of the fruity savoryness of good olive oil. The longer the cake sat, the stronger the lemon and rosemary flavors became; however, we both insisted on trying a few bites immediately after it came out of the oven. I whipped up a blackberry marmalade glaze and drizzled it over the hot cake. And then I snuck another little slice on my way up to bed. And another slice for breakfast. Oh, and another for dessert last night.
This cake, my friends, is not only ridiculously easy, but ridiculously delicious. Great pick this week!
March 16, 2009
Be-still my baking heart...
You know how there are "famous" people within your own little sub-culture? Like, when I was really into USY, I got to meet Safam and just about fell over from star-struck-ness. Many of you are thinking "What the hell is a Safam ?" and that's just what I mean. Other USYers from my time remember that. It's someone famous within your own world, and only people within that world understand.
Now that I've entered the online baking and cooking world, there are a ton of famous bloggers that just about everyone knows. And this past week, two of the most well-known bloggers met in person. Bakerella went to THE RANCH. THE ranch, people. Do you understand what I mean? She freakin' met Pioneer Woman! And they made cupcake pops. This is beyond cool. If you have no idea what I'm talking about, that's okay. I will still be your friend.
To read all about it, go here. Or here.
Kale and White Bean Stew

It's a good side dish, very healthy with dark green kale and hearty white beans. It called for a big can of tomatoes, and I wasn't a huge fan of that. I think that canned tomatoes have a certain metallic sweetness to them that I just don't love. I would like to make this dish again, but I'm not sure what I'll use as a replacement. In order to bulk it up a little for a main meal, I just served it over some whole-wheat pasta, which was a nice addition.
Pi, Pi, ADPi, Like it, Love it, ADPi!
![]() It's amazing that I can't really remember all that much from my college psychology classes, but the words and cheers of all my sorority songs are forever stuck in my head. I think they do that on purpose so that years later, I'll catch myself singing the made-up words to Margaritaville and smile with the memories. In the sorority, an alumna is called a Pi, so I had a little giggle over the fact that I, a Pi, was baking a pie on Pi Day (3.14).
It's amazing that I can't really remember all that much from my college psychology classes, but the words and cheers of all my sorority songs are forever stuck in my head. I think they do that on purpose so that years later, I'll catch myself singing the made-up words to Margaritaville and smile with the memories. In the sorority, an alumna is called a Pi, so I had a little giggle over the fact that I, a Pi, was baking a pie on Pi Day (3.14).


March 12, 2009
Just so you know...

"Shell" I continue?
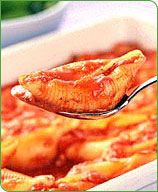 picture from weightwatchers.com because their shells are much prettier than mine
 I know I said I didn't think these were a blog-worthy recipe, but Alex really likes them. And since I'm a blog-slacker (TWD, I'm sorry!!), I'm going to share them with you. They are a tasty meal, filling and low-calorie, and pretty easy to put together.
We're in the process of trying to eat up all our non-Kosher for Passover foods, so it was great to use up most of my leftover pasta shells. I'll blog more about Passover and Kosher for Passover (k4p) foods in a little bit. Right now, the idea of cleaning out the whole kitchen makes me want to curl up in a little ball and cry.
Where was I?...Oh right, Stuffed Shells!
Ingredients:
1 cup part-skim ricotta cheese
1 cup fat-free cottage cheese
1 tsp table salt
1 tsp garlic powder, or to taste
1 TBS dried oregano
1/4 tsp black pepper
3 cups canned tomato sauce
1 pound cooked pasta, jumbo shells, approximately 24 shells
Optional: I add in defrosted and drained chopped spinach to bulk up the filling and add some greens! It's a good addition - try it! I also mix in a little reduced fat mozzarella cheese to up the gooeyness factor.
Instructions:
Preheat oven to 375°F.
Fill a pot with water and cook the shells according to directions. I put more than 24 shells in because some will split while cooling and it's hard to fill the broken ones! While they are cooking, mix together cheeses, salt, garlic powder, oregano and pepper in a medium bowl. Mix in spinach if you're using it.
Spread a few spoonfuls of tomato sauce on bottom of a 9- x 13-inch baking dish and move it around so the bottom is covered.
When cooked shells are cool enough to handle, fill each shell with cheese mixture and place in the baking dish. When all the shells are in the dish, spoon the remaining tomato sauce over shells. You can sprinkle on some mozzarella here if you wish, but be sure to count the points for anything you add! Cover the pan with foil and bake for 20-30 minutes, until the sauce is bubbling.
Yields about 4 shells per serving = 4 points (without mozzarella added in)
March 6, 2009
Hamentaschen

March 3, 2009
Grilled Romaine, Alton-style
Alex and I are addicted to Good Eats, on the Food Network. Alton has given us great cooking and baking tips over the years and it's always fun to learn about the science behind each recipe. It's a little reminiscent of Mr. Wizard, and that makes me smile. He also has really punny names for each episode like "Tender is the Loin" or "This Spud's for You."
A while ago, Alton did a bit about grilled romaine, which looked so delicious, Alex just had to try it. And it was great! Technically, it's not grilled, but rather just pressed down into a hot pan for about 60 seconds, but it's more pleasant to say Grilled Romaine rather than Hot Romaine. That just sounds gross. And it's not! Trust me, this is soooo good. Toasting the cheese gives it a slightly nutty flavor, and the grilled romaine has a really warm taste. It's a great side dish, but just make sure there are enough romaine hearts for everyone.
Ingredients:
Romaine hearts (one heart = 2 servings)
2-3 tsp olive oil
Ground pepper
Grated parmesan cheese
Red wine vinegar
Instructions:
Cut each heart of romaine in half lengthwise so that the root keeps each piece together. Lightly brush the cut side of the romaine pieces with olive oil. Season with the pepper. Place the cheese in a shallow pan large enough to lay the romaine in and press the cheese firmly onto the cut side of the romaine until it adheres.
Spray a nonstick griddle or saute pan with vegetable spray and preheat over medium-high heat. Place the romaine in the pan and cook until the cheese turns golden, approximately 1 to 2 minutes.

Place the romaine, cheese side up onto plates and sprinkle with the vinegar. Serve immediately.
Snow Day Baking


If you've ever been to a Kosher deli or supermarket, you should know what Halva is. It's a Middle Eastern candy made from tahini paste and it's got a wonderfully unique flavor. A few weeks ago, a coworker came back from Israel and brought some authentic Halva back with her. It was melt-in-your-mouth amazing and inspired me to dig up this recipe and try to make Halva cookies!
After they baked and cooled, the tahini/halva flavor was a little less pronounced than I would have liked, so next time I'll add in more. Overall, though, these were a delicious cookie to dip in a cup of tea.
Ingredients:
3/4 cup butter, room temperature
1 cup brown sugar, packed
1/5 tsp baking powder
1/4 tsp ground nutmeg
1 egg
3 TBS tahini (sesame paste)
1 tsp vanilla extract
1 cup whole wheat flour (I didn't have this so I just used regular)
1 2/3 cup regular flour
1/3 cup sesame seeds
Instructions:
Preheat oven to 375, rack in the middle position. Line baking sheet with parchment paper or silicone mats.
Using either a hand-mixer or stand-mixer, beat the butter on medium speed until creamy, about 1 minute. Add the brown sugar, baking powder, and nutmeg; beat until combined. Beat in the egg, tahini, and vanilla. Slowly add in the dry ingredients, mixing until just encorporated. Use a wooden spoon to mix in any streaks of flour and the sesame seeds.
Shape the dough into 1-inch balls and place them on a baking sheet, about 2 inches apart. Flatten eath ball by pressing with the tines of a fork in a criss-cross position. Dip your fork in flour or sugar to prevent it from sticking.
Bake until lightly browned, 7-10 minutes. Remove from baking sheets and allow to cool on a rack.
Presto Chango!


*color is Awning Red, by Behr