Showing posts with label side dishes. Show all posts

April 7, 2013

Toddler Approved...sort of

Trying to get a toddler to eat vegetables can sometimes be like herding drunk cats covered in motor oil. He'll scarf down broccoli one day, and then fling it across the table with a loud "NO!" the next. This Pinterest (what else?!) inspired recipe was a big hit...for one day. He picked at it the next day, pulling out and eating the tomatoes, his favorite. But overall, we really enjoyed it. It's a great way to use summer-fresh veggies, and makes a delicious side dish.

Vegetable Tian
Adapted from For the Love of Cooking

Ingredients:
2 TBS olive oil (divided)
1 large sweet yellow onion cut in half and sliced
2 cloves of garlic, minced
1-2 russet potatoes, unpeeled and sliced 1/4 thick
1 zucchini, sliced 1/4 inch thick
1 yellow squash, sliced 1/4 inch thick
3 large Roma tomatoes, sliced 1/4 inch thick
Sea salt, freshly cracked black pepper, to taste
Dried thyme, to taste
1/2 cup of grated Parmesan cheese

Instructions:
Preheat the oven to 375 degrees. Coat a baking dish with olive oil cooking spray. Heat 1 TBS of olive oil in a large skillet over medium heat. Once hot, add the onions and saute until translucent, about 8 minutes. Add the garlic and cook for another 60 seconds. Spread the onion mixture on the bottom of the greased baking dish.

Layer potatoes, zucchini, squash and tomatoes alternately in the dish on top of the onions, fitting them tightly into a spiral, making only one layer. (I didn't have a round dish, so I just did rows in a rectangular dish. Still tasty!) Season with sea salt, black pepper and dried thyme, to taste. Drizzle the last tablespoon of olive oil over the top.

Cover the dish with tin foil and bake for 35 minutes, or until the potatoes are tender. Uncover and sprinkle the Parmesan cheese on top and bake for another 25-30 minutes or until browned. Enjoy.

February 16, 2012

Captain Vegetable


One of the easiest and tastiest ways to serve vegetables, in my humble opinion, is to roast them. The char brings out a crispy savory sweetness in nearly every veggie, and makes them so delicious. Roasted (and grilled!) asparagus is one of our favorite side dishes. It's so simple, too.
Ingredients:
1 bunch raw asparagus
Olive oil
Salt & Pepper

Instructions:
Pre-heat oven to 425.
Trim the woody ends off of the stalks (easy to do by snapping them off where they break. If you try to snap it and it doesn't break, try another point along the stalk). Lay all the trimmed stalks on a baking sheet. Drizzle with olive oil and then sprinkle on S&P. Toss everything together to make sure it's fully coated, and roast for about 15-25 minutes, until they are slightly charred and crisp on the ends.

Serve hot and enjoy!

May 16, 2011

Chip, Chip, HOORAY!


Trust me. These aren't gross and scary, but rather delicious and incredibly addictive. However, just don't eat a whole baking sheet full of them. Again, trust me.

Kale Chips
adapted from allrecipes.com

Ingredients:
1 bunch kale, stems removed and torn into bite-sized pieces (I use the bags of pre-torn kale, but be sure to tear out the stems and re-wash it yourself)
Olive oil (I use the spray for better coverage)
Salt
Pepper
Old Bay (optional)


Instructions:
Preheat oven to 350. Combine kale with olive oil, salt, pepper and old bay, if using. Spread out into an even layer on the baking sheet and bake for 12-15 minutes. Keep a VERY close eye on this, as it can burn easily. You want the chips to be slightly browned and crisp, not soggy.

September 20, 2010

I love knishes 'cuz they're so delicious...


This is a family favorite recipe for the Jewish High Holidays, but they are especially tasty for breaking your fast over Yom Kippur. Creamy potatoes wrapped in butter puff pastry? Yes please!

It's a very simple recipe and you can fill the knishes with whatever your little heart desires. I think next time, I'll try meat knishes and/or broccoli in addition to potato! Oh, and please don't judge me for using instant potatoes. It's a heckuva lot easier to make them smooth and rollable if you don't have to mash them by hand.

But they are worth it! We had an absolute smorgasboard for Break Fast this year (as usual!) and everything disappeared from the table. I did catch the dog licking up puff pastry crumbs from the floor, so I know she approves of the knishes. Even the little kids liked them, which is a win in my book!

Ingredients:
1 package puff pastry, thawed
Potato Buds (or potatoes mashed by hand)
1 egg
1 onion, chopped
Salt and pepper, to taste
Olive oil

Instructions:
Preheat oven to 350. Thaw out the puff pastry according to instructions, and pinch the seams together so it's in one solid piece.

Sautee up the onions, set aside. Make the mashed potatoes, either by following box instructions or by hand. If you're doing it by hand, you might want to consider pureeing them so they aren't too lumpy. Think true "mashed" potatoes instead of the trendy "smashed" potatoes! Combine potatoes and onions together. Stir in the egg as a binder.

Place the puff pastry sheet on a lightly greased baking sheet, and lay out a line of filling on the end closest to you. Gently roll the pastry away from you, tucking up the edges as you go, so the filling won't spill out. It's a little messy. It helps to have a towel handy! Lay it seam side down, and repeat with the second pastry roll.

Brush the tops of the rolls with a little melted butter or egg wash, and score the top. I like to score it where I'll eventually end up cutting the completed knishes. This lets the steam out, and helps as a guide for serving portions.

Bake for about 25-30 minutes, until the pastry is golden brown and flaky. Allow to cool slightly before cutting into slices and then serve warm.

September 8, 2010

Peanut Butter Noodles


So one of the fun things about a work potluck is that I can make something I've been craving, knowing that there will be leftovers. Peanut butter has been a staple of my baby-diet, so it's no surprise that I zeroed in on this recipe.
I found a highly-rated recipe online and tweaked it for my tastebuds. I also made this at 10pm, after a very long day, so I was too lazy to do some of the required steps. However, the final product was pretty tasty, if I do say so myself!

Peanut Butter Noodles
adapted from allrecipes.com. I doubled everything for our potluck, and probably ended up adding 1/2 cup of peanut butter, total.

Ingredients:
1/2 cup chicken broth (vegetable or water. Broth was pretty salty)
1 1/2 tablespoons minced fresh ginger root (or a few teaspoons of powdered ginger)
3 tablespoons soy sauce
3 tablespoons peanut butter
1 1/2 tablespoons honey
2 teaspoons hot chile paste (optional)
3 cloves garlic, minced (I was lazy and skipped)
8 ounces Udon noodles (I used linguine)
1/4 cup chopped green onions
1/4 cup chopped peanuts

Instructions:
Bring a large pot of water to a boil. Add noodles and cook until tender according to package directions. Drain.

Meanwhile, combine chicken broth, ginger, soy sauce, peanut butter, honey, chili paste, and garlic in a small saucepan. Cook over medium heat until peanut butter melts and is heated through. Add noodles, and toss to coat. Garnish with green onions and peanuts.

May 31, 2010

Chipotle Potato Salad


This stuff is addictive...delicious, smokey, hot yet cool, and crisp. It's perfect for any summer BBQ, so I insist that you make this for the 4th of July. Alex's sister is the expert in this recipe, but I begged for it and she generously shared. She did ask that I not tell anyone how easy it is, so I'll give this caveat - it's time consuming! But sooooo worth it.

Ingredients:
Chipotle mayo
3/4 cup mayo
2 TBS minced canned chipotles in adobo sauce (or to taste)
2 TBS lemon or lime juice

Chipotle potato salad
6 cups diced red bliss potatoes
1 tsp salt
2 celery stalks
2 scallions
1 bell pepper (red or yellow for color)
chipotle mayo
cilantro, optional

Instructions:
Bring a pot of salted water to a boil and cook the potatoes until they are almost tender. It's good to leave them a little "al dente" because they will continue to cook afterwards.
While they are boiling, combine all mayo ingredients and blend with immersion blender.
Finely chop celery and scallions, chop pepper into small pieces Drain potatoes in a colander under cold water when they're done; combine ingredients in a bowl, add salt to taste.

Alex's Black Beans and Rice


Alex is a great cook. Poor guy, though, he works such long hours sometimes that he doesn't have the time or the energy to get into the kitchen. This weekend, though, he was able to make one of his favorites - beans and rice.

The recipe that follows is a rough estimate of what he put in, but the main ingredients are here. He said that they key is to mash some beans separately, and then add them back in, in order to thicken the whole mixture. It's a smokey, tangy, and spicy delight. If you're not into spice, you can leave out the chipotle pepper...but I encourage you to try it!

Ingredients:
1 chipotle pepper in adobo sauce, scraped and diced (scraping means to remove the inner seeds which are the really spicy part. Do not use your hands! Hold the pepper with a fork and scrape with a knife. If you want to add smokey flavor without a lot of heat, you can throw in 1-2 tsp of the adobo sauce instead)
1 whole tomato, diced
3 cloves garlic, diced
1 medium onion, chopped
1 TBS oil
1 tsp oregano
1 tsp cumin (to taste)
2 cans black beans, drained and rinsed. Remove 1 cup of beans and mash them with a fork in separate bowl.

Instructions:
Heat up the oil and saute the pepper, onion until soft and translucent. Add the garlic at end, so it doesn't burn. Stir in the mashed beans, along with the tomato. Add in rest of beans and spices. Bring it to boil, stirring occasionally. Turn down heat and allow to simmer for 15 minutes, covered. Uncover and simmer for another 5-10 minutes to thicken. Serve over rice.

April 2, 2010

Passover Recipes: Matzah Apple Kugel and Garlic Brisket

More! Food! It just keeps coming!

It's the Jewish way, folks.
They tried to kill us.
They didn't succeed.
Let's eat!

Matzah Apple Kugel
adapted from allrecipes.com


Passover kugels aren't necessarily the best thing. No flour, no noodles...only matzah, maztah meal or matzah cake meal. However, this apple kugel was a surprise! It was flavorful and moist, and I cut back on the sugar so it wasn't too sweet. Everyone at the seder enjoyed it. The only change I would make for next time is to use a 9x13 baking dish instead. I like a crispy kugel and this didn't really have a chance for that in the 2-quart casserole dish.

Ingredients:
4 matzo crackers, crushed
3 eggs, beaten
1/4 cup white sugar (I used slightly less)
1 tsp salt
1/2 tsp lemon juice
1/3 cup applesauce (unsweetened)
3 Granny Smith apples - cored, peeled and chopped
1/2 cup dried cranberries or raisins

1/4 cup white sugar (I used about 3 TBS)
1 teaspoon ground cinnamon

Instructions:
Preheat the oven to 350 degrees F (175 degrees C). Place the crumbled matzos in a medium bowl, and add enough water to cover. Let stand for 2 minutes, then drain off excess water. Do not squeeze.

To the bowl of matzo, add eggs, 1/4 cup sugar, salt, lemon juice and applesauce. Stir to combine. Mix in the apples and dried cranberries. Spread the mixture evenly into a 2 quart casserole dish. Mix together the remaining 1/4 cup of sugar, and cinnamon; sprinkle over the top.

Bake for 45 minutes in the preheated oven, or until the top is golden, and the apples are soft.


Braised Brisket with Thirty-Six Cloves of Garlic
adapted from epicurious.com


Oh, man, this is soo good. The garlic cloves mellow out during the cooking process and become sweet, instead of pungent. The gravy is then finished with chopped rosemary, more garlic and a sprinkling of lemon zest for an extra oomph.

The only complaint I have is that using a kosher brisket makes for a very salty gravy. I added broth, more rosemary and even MORE broth...but it was still pretty salty. Overall, it didn't ruin things, but I think that next time, I'll make my gravy with help from one of those gravy packets...minus the salt.

The low and slow cooking time braises the brisket perfectly, so that it becomes fork-tender and just melt in your mouth good. If you're looking for a good brisket recipe, you can't really go wrong with this one.

Ingredients:
36 fat unpeeled garlic cloves (1 2/3 to 2 cups) or an equivalent amount of smaller cloves, plus 1 teaspoon minced garlic (I used pre-peeled cloves)
3 tablespoons olive oil
A first-or second-cut beef brisket (about 5 pounds), trimmed of excess fat, wiped with a damp paper towel, and patted dry
2 TBS red wine vinegar
3 cups chicken broth, preferably homemade or good-quality low-sodium purchased
3 or 4 fresh thyme sprigs, or 2 teaspoons dried leaves
2 fresh rosemary sprigs, plus 1 teaspoon chopped leaves
Salt and freshly ground black pepper
1 tsp grated lemon zest

Instructions:
Preheat the oven to 325°F.

Heat the olive oil over medium-high heat in a heavy-bottomed roasting pan or casserole large enough to accommodate the meat in one layer. Use two burners, if necessary. Add the brisket and brown well on both sides, about 10 minutes. Transfer the brisket to a platter and set aside. (Or brown the meat under the broiler: place the brisket, fat side up, on a foil-lined broiler pan under a preheated broiler. Broil for 5 to 6 minutes on each side, until browned. Don’t allow it to develop a hard, dark crust, which might make the meat tough or bitter. Move the meat around as necessary, so it sears evenly.)

Pour off all but about 1 tablespoon of fat remaining in the pan and add the garlic cloves. Cook over medium heat, stirring occasionally, until the garlic edges are tinged with gold. Add the vinegar and deglaze the pan, scraping up all the browned bits from the bottom with a wooden spoon. Add the stock, thyme, and rosemary sprigs, and reduce the heat to a simmer. Salt and pepper the brisket to taste on all sides, and add it to the pan, fat side up. Spoon the garlic cloves over the meat.

Place the brisket in the oven, cover (if you have no lid, use heavy-duty foil), and cook, basting every half-hour, until the meat is fork tender, 2 1/2 to 3 hours or longer. (As the meat cooks, periodically check that the liquid is bubbling gently. If it is boiling rapidly, turn the oven down to 300°F.)

The brisket tastes best if it is allowed to rest, reabsorbing the juices lost during braising, and it's easiest to defat the gravy if you prepare the meat ahead and refrigerate it until the fat solidifies. That is the method I use, given here, but the gravy can be prepared by skimming the fat in the traditional way, if you prefer. If you go that route though, do let the meat rest in the pan sauce for at least an hour.

Cool the brisket in the pan sauce, cover well with foil, and refrigerate until the fat congeals. Scrape off all solid fat. Remove the brisket from the pan and slice thinly across the grain.

Prepare the gravy: Bring the braising mixture to room temperature, then strain it, reserving the garlic and discarding the thyme and rosemary sprigs. Skim and discard as much fat as possible from the liquid. Puree about one half of the cooked garlic with 1 cup of the defatted braising liquid in a food processor or a blender. (If you want a smooth gravy, puree all of the cooked garlic cloves.) Transfer the pureed mixture, the remaining braising liquid, and the rest of the cooked garlic to a skillet. Add the chopped rosemary, minced garlic, and lemon zest. Boil down the gravy over high heat, uncovered, to the desired consistency. Taste and adjust the seasoning. Rewarm the brisket in the gravy until heated through.

Arrange the sliced brisket on a serving platter. Spoon some of the hot gravy all over the meat and pass the rest in a separate sauce boat. Watch your guests drool.

March 17, 2010

Helene's Easy Cheesy Garlic Crisps


You know how when you're raised with a certain type of food, you think that's how it should always be? Take my grandmother's noodle kugel, for example. Ma (as we called her) used to overbake it, so the noodles on top dried out and had a painful *CRUNCH* to them. I thought that's how noodle kugel was supposed to taste, so I never liked anything else. To this day, I still prefer crunchy-topped kugels.

These garlic crisps are another example. My mom used to make these to go along with pasta in our house, and this is what we called "garlic bread" while growing up. I never really liked the heavy pieces of white bread, dripping with oily butter that they serve elsewhere. These are crisp and light, with a really good garlic flavor. It's also one of the first recipes I "cooked" on my own, back in graduate school. I'm pretty sure I even called her to double-check the recipe.

Ingredients:
Pita bread, split open
Butter
Garlic (or garlic powder, if that's all you have)
Parmesan cheese

Instructions:
Take the split pieces of pita bread and spread each half with butter. You can either then sprinkle with garlic powder, or take a clove of garlic and run it through your microplane zester. Spread the "zested" garlic evenly over the butter. Top with cheese.

Using a pizza cutter, or knife, cut each half into wedges and toast until golden brown.

February 9, 2010

Oh the weather outside is frightful...

Did you know that Maryland got b*tch slapped by Mother Nature this weekend? If you missed out, let me share some pictures from some friends facebook pages:


That was a car. I'm not sure what it is now (taken by my student, Megan)


Taken by my sister-in-law. I'm jealous of her camera.


My friend Sam. Ain't she adorable?


So...as you can see, we spent our whole weekend either huddled on the couch or wielding the mighty snow shovel. Before Blizzard 2010 hit, I ran to the grocery store to make sure that I had enough flour, butter, eggs and sugar to get me through the weekend. This, in hindsight, was the worst idea ever. I spent 5 minutes gathering my groceries and then another 45 minutes waiting in line, surrounded by people who were in sheer panic. Sigh.

What else is there to do on a snowy weekend but bake, right? I decided to try my hand at homemade pretzels, since I haven't had the best luck with yeast-related dishes yet. This is a Martha recipe, and is pretty simple overall. The worst part was rolling and twisting all 32 mini-pretzels, but it wasn't like I had anything else to do!

They tasted great, but not exactly like the kind you get at the ballpark. I think that there should be more baking soda in the water bath, which would help give them more of a shiny crust. I will definitely make these again!

Soft Pretzels
adapted from Martha Stewart Living


Ingredients:
2 cups warm water, 100 degrees to 110 degrees
1 tablespoon sugar
1 teaspoon active dry yeast
5 to 6 cups all-purpose flour, plus more for dusting
1 tablespoon salt
2 teaspoons canola oil
2 tablespoons baking soda
1 large egg
Coarse or pretzel salt
Vegetable-oil cooking spray

Instructions:
Pour warm water into bowl of electric mixer fitted with a dough hook. In a small bowl, combine water and sugar, and stir to dissolve sugar. Sprinkle with yeast, and let sit 10 minutes; yeast should be foamy.

Add 1 cup flour to yeast, and mix on low until combined. Add salt and 4 cups flour, and mix until combined, about 30 seconds. Beat on medium-low until dough pulls away from sides of bowl, about 1 1/2 minutes. Add 1/2 cup flour, and knead on low 1 minute more. If dough is still wet and sticky, add 1/2 cup more flour (this will depend on weather conditions); knead until combined, about 30 seconds. Transfer to a lightly floured board, and knead about 10 times, or until smooth.

Pour oil into a large bowl; swirl to coat sides. Transfer dough to bowl, turning dough to completely cover all sides. Cover with a kitchen towel, and leave in a warm spot for 1 hour, or until dough has doubled in size.

Heat oven to 450 degrees. Lightly spray two baking sheets with cooking spray. Set aside. Punch down dough to remove bubbles. Transfer to a lightly floured board. Knead once or twice, divide into 16 pieces (about 2 1/2 ounces each), and wrap in plastic.

Roll one piece of dough at a time into an 18-inch-long strip. Twist into pretzel shape; transfer to prepared baking sheet. Cover with a kitchen towel. Continue to form pretzels; 8 will fit on each sheet. Let pretzels rest until they rise slightly, about 15 minutes.

Meanwhile, fill large, shallow pot with 2 inches of water. Bring to a boil. Add baking soda. Reduce to a simmer; transfer 3 to 4 pretzels to water. Poach 1 minute. Use slotted spoon to transfer pretzels to baking sheet. Continue until all pretzels are poached.

Beat egg with 1 tablespoon water. Brush pretzels with egg glaze. Sprinkle with salt. Bake until golden brown, 12 to 15 minutes. Let cool on wire rack, or eat warm. Pretzels are best when eaten the same day, but will keep at room temperature, uncovered, for 2 days. Do not store in covered container or they will become soggy.
Here is Martha's pictorial on rolling & twisting. It's pretty self-explanatory:

February 1, 2010

Curried Lentils with Sweet Potatoes and Swiss Chard

That's it folks, I'm smitten. My food blogger crush is complete. Have you been over to Smitten Kitchen yet? No? Oh, please, do yourself a favor and check it out! Deb's blog is not only hilarious, but also drool worthy. I've bookmarked more than a few recipes from her blog, but this was the first time I actually made one.

After about 2 weeks of eating whatever the hell I wanted, I knew that I needed to get back into healthy recipes and better portion sizes. Bring on the vegetables! This is a great recipe, especially if you like curry (which we do.) It's hearty and filling, just a little sweet, and perfect for a cold winter day. However, please keep in mind that it's just not a very pretty dinner. I couldn't seem to take a good photograph of it, so check out Smitten Kitchen for the nice pictures of this dish.

Ingredients:
Adapted from Smitten Kitchen, who got it from The New York Times 11/14/07

Yields 8 to 10 side-dish servings; 6 main-course servings.

2 tablespoons extra virgin olive oil
1 medium onion, chopped
4 garlic cloves, minced
1 1-inch piece fresh ginger root, peeled and grated
1 1/2 teaspoons garam masala
1 1/2 teaspoons curry powder
1 jalapeño pepper, seeded if desired, then minced
4 to 5 cups vegetable broth as needed
2 pounds orange-fleshed sweet potatoes, peeled and cut into 1/2-inch cubes (about 4 cups)
1 1/2 cups dried lentils
1 bay leaf
1 pound Swiss chard, center ribs removed, leaves thinly sliced
1 teaspoon kosher salt, more to taste
1/2 teaspoon ground black pepper
I omitted the following, but I'm sure they taste great in the final dish:
1/3 cup chopped fresh cilantro
Finely grated zest of 1 lime
Juice of 1/2 lime
1/3 cup finely chopped tamari almonds, for garnish (optional), available in health food stores
1/4 cup chopped scallions, for garnish.

Instructions:
In large soup pot, heat oil over medium heat. Add onion and saute until translucent, 5 to 7 minutes. Add garlic, ginger, garam masala, curry powder and jalapeno. Cook, stirring, for 1 minute.

Stir in 4 cups broth, sweet potatoes, lentils and bay leaf. Increase heat to high and bring to a boil; reduce heat to medium, partially cover, and simmer for 25 minutes. (If lentils seem dry, add up to 1 cup stock, as needed.) Stir in chard and salt and pepper, and continue cooking until lentils are tender and chard is cooked, about 30 to 45 minutes total.

Just before serving, stir in cilantro, lime zest and juice. Spoon into a large, shallow serving dish. Garnish with almonds if desired and scallions.


See, I told you it wasn't pretty! But it's delicious.

December 18, 2009

Curried Sweet Potato Latkes


Being Jewish, there are certain names that I hear tossed around all the time. I have an instant recognition of these people, even though I've never met them.

Mel Brooks...
Steven Spielberg...
Barbara Streisand...
Adam Sandler...
Jerry Seinfeld...
Dr. Ruth...
Joan Nathan...

Now, some of you might not recognize that last name. But if you grew up in a household with homemade brisket, challah, matzah ball soup, and any other dishes with Yiddish/Hebrew names, Joan Nathan should be familiar to you. In my humble opinion, she's to Jewish cooking what Paula Deen is to Southern cooking.

Jewish Cooking in America is a staple in many Jewish kitchens. If I'm looking for a classic Jewish recipe (and I can't find it amongst my mom's or Bubbie's collection), I'll turn to Joan Nathan. If I'm about to eat something, and the cook says "Oh, I used Joan Nathan's recipe..." I know it's going to be good. She never lets me down!

These latkes were outstanding. The perfect combination of sweet and spicy, they warmed us up last night even when our house was 50 degrees (busted furnace.) The only complaint I have is that the batter had some sort of chemical reaction to the oil, so by the end of the batch, it was all foamy and didn't fry the last ones very well. That could very well be user-error!
Nonetheless, you should definitely make these. Latkes like shouldn't be saved until Hannukah only. Where's the fun in that?

Ingredients:
adapted from Jewish Cooking in America
1 pound sweet potatoes, peeled
1/2 cup all-purpose flour
2 tsp sugar
1 tsp brown sugar
1 tsp baking powder
1/2 tsp cayenne powder
2 tsp curry powder
1 tsp cumin
Salt and freshly ground pepper to taste
2 large eggs, beaten
1/2 cup milk (approximately)
Peanut oil for frying

Instructions:
Grate the sweet potatoes coarsely. In a separate bowl mix the flour, sugar, brown sugar, baking powder, cayenne pepper, curry powder, cumin, and salt and pepper.

Add the eggs and just enough milk to the dry ingredients to make a stiff batter. Add the potatoes and mix. The batter should be moist but not runny; if too stiff, add more milk.

Heat 1/4 inch of peanut oil in a frying pan until it is barely smoking. Drop in the batter by tablespoons and flatten. Fry over medium-high heat several minutes on each side until golden. Drain on paper towels and serve.

December 14, 2009

Was it gouda for you, too?


I do love potato latkes. The simple crispy cakes, hot from the stove and topped with sour cream and applesauce, are a piece of my childhood. My Bubbie made them from scratch, as does my mother. In the past few years, though, I have cheated and gone with the frozen Trader Joes latkes. They are really good, and a lot less work! This year, though, I knew I had to get down and dirty and make them myself.

I wanted to play around with the basic recipe, so I turned to an old Rachael Ray favorite. I know, I know...some of you can't stand her, but I think she's pretty fun. This version is delicious, but a bit messy to make. Frying anything leads to spatters and burns, with lots of oil drips all around. Just be ready to clean up afterwards!

Oh, and don't be like me and grate everything by hand. How on EARTH did I forget that I have a grater insert for my Cuisinart?? That was a fun realization. I was talking to my cousin, Paige, who made 3 dozen (!!!!!) latkes for a family Hanukkah party. I commented that I got such a good arm workout from grating everything, and she just stared at me and said "Um, I used my food processor."
Oh. Biker.
::facepalm::

Potato and Gouda Latkes
adapted from Rachael Ray

Ingredients:
2 pounds all purpose potatoes, such as Russets, about 3 large potatoes, peeled and shredded
1 small onion, grated
3 TBS all-purpose flour
1 1/4 cups shredded smoked gouda cheese, the yield of an 8-ounce piece
Vegetable oil, for frying

Instructions:
Heat a nonstick skillet over medium high heat. Add a thin layer of olive oil or vegetable oil to the pan, just enough to coat the bottom.

Combine potatoes with onions and flour. Mix in shredded cheese. Spoon piles of potato and cheese mixture into the pan, making 3-inch rounds, 1-inch apart. Cook cakes until golden and crispy, about 4 minutes on each side. Remove cooked cakes and repeat process.

Serve hot with sour cream and applesauce.

November 19, 2009

Eggplant "Pasta" and My Kitchen Crush

I must confess a crush. It's perfectly harmless, and Alex is well aware of this, but still...I feel the need to explain:

::cue 15-year-old-Edward Cullen-induced-sigh::

What can I say? I have a thing for the nerdy kitchen aficionado. Alton Brown, brainy host of the Food Network's Good Eats, is one of my favorite people to watch on television. I really like how he explains the science behind each ingredient and each recipe, and I find myself mimicking his techniques in the kitchen. He even did one whole show on knife skills - how adorably nerdy is that? ::sigh::

Anyways, this eggplant recipe is from an episode I saw many times, but never really thought about making it since he only shows the recipe for about 30 seconds. However, I have heard that it's in his new cookbook and when I saw it posted on a few other blogs, I decided to give it a shot.

The eggplant is sliced and purged before you work with it, which removes a good portion of the liquid and leaves the eggplant more malleable and less raw-tasting. It's then sliced into pasta-sized ribbons and quickly satueed with tomatoes, basil, garlic, milk (cream) and cheese. All in all, it was pretty dang tasty!

However, it was not as filling as we had hoped, so even after we polished off the entire panful, Alex and I were scavenging for more dinner. I'll definitely make this again, but either as a side dish in a larger meal, or just as dinner for one. My appetite has definitely increased since I started the twice-weekly personal training and then spinning sessions!

Clearly, you have to like eggplant or you won't like this. You know it's not pasta, and it's not trying to taste like pasta, but it's a great new way to cook one of my favorite vegetables.

Ingredients:
adapted from Good Eats
2 medium-large eggplants
Kosher salt, for purging
4 TBS olive oil
1 tsp garlic, minced
1/2 tsp chile flakes (use less, unless you really like the heat!)
4 small tomatoes, seeded and chopped
1/2 cup cream (I used 1% milk and it was just fine)
4 TBS basil chiffonade
1/4 cup freshly grated Parmesan
Freshly ground pepper

Instructions:
Peel each eggplant leaving 1-inch of skin at the top and bottom unpeeled. Slice the eggplant thinly lengthwise, about 1/4-inch thick. Evenly coat each slice with the salt and purge on a sheet pan fitted with a rack for 30 minutes.
Rinse with cold water and roll in paper towels to dry. Slice the pieces into thin strips to resemble pasta.

In a large saute pan heat the oil. Add the garlic and chili flakes and toast. Add the eggplant "pasta" and toss to coat. Add the tomatoes and cook for 3 minutes. Add the cream and increase heat to thicken sauce.

Finally add the basil and Parmesan and toss to combine. Season with pepper, no salt needed as the eggplant will have residual salt from the purge. Serve immediately.

Sorry for the shaky picture. I was so hungry at this point that I didn't have the patience to take a good photo!

October 22, 2009

Anniversary Dinner Menu


For our 2nd anniversary celebration, I made us a nice homey dinner. We toasted 2 wonderful years with our new favorite wine, a rich and mellow Burgundy from Renault Winery in NJ. I know, Jersey wine? What? Trust me, it's delish!

Alex requested a simple roast chicken and I played around with some new side dishes. This roasted chicken recipe is my go-to choice, easy enough to throw together last minute on any type of chicken and it really highlights the natural flavors.

One side dish choice was inspired by a CSA gift from a friend - swiss chard! I had not had good swiss chard in a while, so I was looking forward to this. It's a nice and buttery green, with a unique flavor. It can be cooked in the same manner as spinach or kale, easy enough to saute up with some garlic and red pepper flakes.

Lastly, I tried a new potato dish that wasn't a 100% success, but I'm willing to try again because it has potential. Hasselback potatoes should be sliced veeeeeery thinly, but I was in a hurry and I think that impacted cooking time. Okay, I know that impacted cooking time! Overall, though, good flavor and easy enough to play around with!

Simple Roast Chicken
Ingredients:
8 pc chicken, rinsed and patted dry
Olive oil (about 1/4 cup, maybe less)
Dried rosemary, thyme, poultry seasoning (about 1-2 TBS each)
Garlic powder (optional)
Salt & pepper


Instructions:
Preheat your oven to 425 and lightly spray a 9x13 baking dish. Place the chicken pieces inside, skin side down, making sure they are in a single layer.
Pour the olive oil and spices into a small bowl and mix well. Using a basting brush, coat each piece of chicken with the oil mixture, and then flip and repeat. They should be skin side up when they go into the oven. Bake for 30-35 minutes, basting once or twice, or until chicken is 165 degrees inside.
Allow to rest 10 minutes before serving.

Hasselback Potatoes

Ingredients:
Baking potatoes (one per person)
Olive oil, to coat potatoes (about 2 tsp per potato)
Garlic cloves, sliced very thinly
Salt & pepper
Other spices optional (rosemary, thyme, etc)

Instructions:
Preheat oven to 450. Lay two wooden spoons down next to each other on a cutting board and place the potato in between the handles. Using a knife, cut thin slices into the potato, but use the spoon handles as a guide to make sure you don't cut all the way through.
Place a slice of garlic in between each potato layer and sprinkle with salt & pepper. Pour olive oil over each potato, rubbing it in well. Put potatoes into a shallow baking dish and bake for about 35-45 minutes, until they are done. Might take longer, depending on your oven.

Sauteed Swiss Chard
adapted from Simply Recipes

Ingredients:
1 large bunch of fresh Swiss chard
1 small clove garlic, sliced
2 TBS olive oil
2 TBS water
Pinch of dried crushed red pepper (really, no more! It's pretty spicy with just a pinch!)
Salt

Instructions:
Rinse out the Swiss chard leaves thoroughly. Remove the toughest third of the stalk, discard or save for another recipe. Roughly chop the leaves into inch-wide strips.

Heat a saucepan on a medium heat setting, add olive oil, a few small slices of garlic and the crushed red pepper. Sauté for about a minute. Add the chopped Swiss chard leaves. Cover.
Check after about 5 minutes. If it looks dry, add a couple tablespoons of water. Flip the leaves over in the pan, so that what was on the bottom, is now on the top. Cover again.

Check for doneness after another 5 minutes (remove a piece and taste it). Add salt to taste and serve.

September 1, 2009

Lebanese Green Beans (Loubia B’Zeit) & Smoked Garlic Chicken

***TWD Espresso Cheesecake Brownies coming tomorrow! I'm going to bake them tonight for a work potluck on Wednesday***


Never go food shopping when you're hungry. I know this simple rule, yet I can't ever seem to follow it. My latest discretion was a visit to the oh-so-lovely Belvedere Square market during a lunch hour, where I wandered past the Neopol Smokery. Usually, just the aroma alone is enough to make me want to lick the display windows, but on that particular day, I was in for a deadly one-two punch. I was hungry and there was a really cute guy working the front counter. He's a charmer, that one. So much so that he charmed me right out of $8 for a head of smoked garlic and a small container of their amazing smoked salmon salad. As my sister-in-law says, that stuff is like crack. It's so good.

Please don't judge me. You weren't there. You don't know!

So there I was, with a head of smoked garlic, just hanging out in my fridge, waiting to be turned into a masterpiece. I was happy enough to spread a bit of it on toast and devour it, but I figured that I should at least try to make an effort for a full meal. Smoked garlic is similar to roasted garlic, in that it become soft and spreadable and a lot more mellow-tasting. The sharp garlic taste is replaced by a smokey, almost sweet flavor that is very easy to enjoy. (If you haven't ever roasted garlic, I highly recommend it! It's so simple).


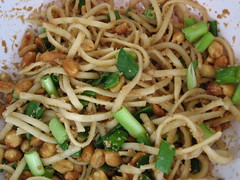
My friend Andrea recommended a Lebanese side-dish that her husband makes all the time. Mazen is from Beirut and whenever he and Andrea take their family back there for a visit, she posts pictures of all the amazing food they eat. I love Lebanese food, so I knew I had to try this dish. It was a good recipe, but I don't think the smoked garlic was the best choice. The flavor was a little too mellow and didn't really come through. I'll make this again, but with fresh garlic next time!


Lebanese Green Beans (Loubia B’Zeit)

Ingredients:
this serves 6. I didn't realize that and now we have a ton leftover!
1/2kg of fresh green beans, trimmed (approx. 2 lbs)
400g ripe tomatoes, diced or 1 tin of crushed tomatoes (I used a large can of crushed. Fresh would work better!)
3 brown onions, chopped
2 cloves of garlic crushed
3 tbs olive oil
2 tbs lemon juice
salt & pepper

Instructions:
Heat the olive oil in a pan over a medium heat. Add the chopped onions and sauté until very soft, around 10 minutes.

Add the garlic, beans, salt and pepper and any dried herbs (if using – see note below), and saute for on a low heat for 10-15 minutes, or till the beans started to wilt.

Add the tomatoes and lemon juice, then bring to a boil.

Cover and cook over a very low heat until the tomatoes form a thick sauce – around 45 minutes.
Season with fresh herbs or salt & pepper here if using them, but delicious as is.


I also used the garlic in a chicken recipe that I just kind of threw together. This was a better way to highlight the smoked garlic, since you could spread it on each bite of chicken as you went along.


Smoked Garlic Chicken

Ingredients:
1 lb boneless skinless chicken breasts
5-7 cloves smoked garlic, peeled
1 tbs olive oil
Poultry seasoning (dried thyme, rosemary, salt, pepper, garlic)

Instructions:
Preheat oven to 425. Spray a cooking dish with cooking spray.

Divide the olive oil over all the chicken and coat evenly. Season each breast with herbs and lay in the baking dish. Top each with a few cloves of garlic, and cover the dish with foil. Bake for about 35 minutes, or until chicken registers 165 degrees. While it's still hot, mash up each garlic clove on top of the chicken and spread around, almost like butter.

August 3, 2009

Spicy Garlic Greens

We all know that we need to eat our greens. But sometimes gooey and cheesy is much more appealing than dark and leafy (which, incidentally, makes it sound like you're about to eat a forest.) Because of that, I like to dress up my greens. Usually I use a cute little bow-tie or top hat, but in this case I went with garlic and red pepper flakes.

Alex's mom brought us a bag full of kale from her organic garden and I knew immediately what I wanted to do with it. Kale isn't something I used to try, but once we made this recipe, I was hooked. In its raw form, kale is pretty rough-looking and intimidating, but it's easily tamed if you know how to finesse it a little bit. I love this recipe because I love garlic. Raw, roasted, grilled, simmered, smeared, sauteed, baked, sliced, fried, mashed...you do it to garlic and I'll eat it. There's something addictive about the pungent and spicy taste that can change to sweet and mellow in the blink of an eye. There is a restaurant in SanFran that I hope to get to someday, called The Stinking Rose. That's my kind of place!

When you're cooking greens, always remember that they will release a lot of water and cook down to less than 1/3 of the original size. My pan started off looking like this:


And after about 5 minutes, it had cooked right down to this:

Remember that when you're thinking "There is now way this will all fit in my pan! It's too much."
Since I knew the kale would really shrink, I threw in a few big handfuls of baby spinach. This recipe can be used for any green leafy vegetable, but I find that spinach and/or kale work best. It's a great side for any protein you wish to serve, or you can whip up a big batch of this and mix it with pasta. C'mon...it's good for you!

Ingredients:
1 large bag of kale, stems removed and ripped into bite-sized pieces (or spinach)
1 clove garlic, finely chopped
1-3 tsp red pepper flakes, to taste
2 tsp olive oil

Instructions:
Heat olive oil in a large non-stick skillet and add garlic. Cook until fragrant, 1 minute or so, being careful not to let it brown. You want to flavor the oil in the pan, so make sure to stir the garlic around evenly.
Add the greens and continue to cook over medium-high heat, stirring occasionally. The greens will start to wilt almost immediately. Keep stirring until they reach your desired texture. Add in red pepper flakes and stir to combine. They add a lot of heat, so be sure you know your tolerance first!
Serve hot.

November 30, 2008

Easy, Healthy and Yummy Side Dishes

Here are two of the side dishes that I made for Thanksgiving this year. Both are very easy and very good; they were great compliments to the rest of the family dinner. They are also Weight Watchers recipes, so you know they are good for you!

Sauteed Green Beans with Pine Nuts (1 point per serving)

Ingredients:
1/2 cup(s) slivered almonds (I used pine nuts)
2 tsp olive oil
2 medium garlic clove(s), minced
8 cup(s) green snap beans, fresh, trimmed (please don't use frozen! They will be mushy)
1/2 cup(s) canned chicken broth, or vegetable broth
1/2 tsp table salt, or to taste
1/4 tsp black pepper, freshly ground, or to taste

Instructions:

Place almonds in a large dry skillet and place pan over medium heat. Cook until nuts are golden brown, shaking pan frequently, about 2 to 4 minutes. Remove nuts from pan; set aside.
Heat oil in same skillet over medium-high heat. Add garlic and cook , stirring, 1 minute. Add string beans and sauté 1 minute. Add broth to pan; cover and steam until string beans are crisp-tender, about 3 to 5 minutes. Add salt and pepper; stir to coat. Remove from heat; stir in toasted almonds. Yields about 3/4 cup per serving.


Barley with Apples, Onion and Squash (3 points per serving)

Ingredients:
3/4 tsp table salt, divided
1/2 cup(s) uncooked barley
1 tbsp olive oil
2 cup(s) butternut squash, diced
1 cup(s) onion(s), chopped
1/2 cup(s) sweet red pepper(s), diced
1 medium apple(s), peeled, cored, diced
1 1/2 tsp minced garlic
3/4 tsp dried thyme
1/4 tsp black pepper
1/3 cup(s) fat-free, reduced-sodium chicken broth

Instructions:
Bring 3 cups of water and 1/2 teaspoon of salt to a boil in a medium saucepan; add barley.
Cover saucepan and simmer barley until tender, about 30 to 35 minutes; drain.
Meanwhile, heat oil in a large nonstick skillet over medium-high heat; add squash, onion and red pepper. Cook, stirring often, until vegetables are browned and almost tender, about 8 minutes.
Stir in apple, garlic, thyme, black pepper and remaining 1/4 teaspoon of salt. Cook, stirring, until apple is almost tender, about 2 minutes; stir in broth, scraping bottom of skillet with a wooden spoon to loosen any browned bits. Stir in cooked barley; toss over low heat to mix and coat. Remove from heat and serve. Yields about 3/4 cup per serving.