Showing posts with label parve. Show all posts

August 7, 2014

B'tay Avon!

One of my favorite parts of living in Israel was the food - fresh hot pita from the bakery, savory juicy shwarma carved right in front of you, creamy hummus at every meal and crispy falafel covered in tahini sauce and salads/veggies. I've tried to recreate as many of those foods as I can on my own, and when I can't, I simply head over to any local Middle Eastern restaurant and indulge my craving. 

Since I've been on this Standard Elimination Diet (SED); however, it's not that simple. I can't eat anything from a restaurant, on the off-chance that it's been contaminated by something that will cause me to flare. Usually, I've found that nightshades are the culprit, as paprika, red pepper flakes, and cayenne are used very often as a spice...especially in falafel. Who knew!? 

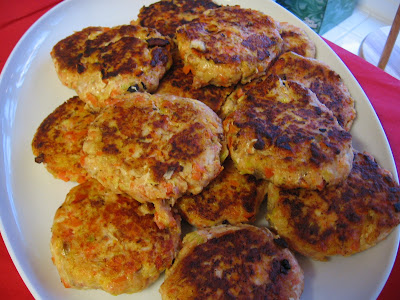
I did find a recipe, though, that allowed me to adapt falafel to my SED, and when I paired it with some homemade hummus (coming in another post) and tahini sauce, it really hit the spot. Now, it's definitely nowhere near as good as my favorite falafel stand in the middle of Mahane Yehuda market in Jerusalem (chetzi eish t'nor em chips, hummus, tahini, v'kol h'salateem, b'vakasha!) but it was pretty dang good. Even the threenager liked it - never mind the fact that we had to agree that it was a Spongebob crabby patty. He ate it, and that's what counts! 


Falafel Burger 

Ingredients: 
2-3 large garlic cloves
Packed ½ cup fresh parsley
Packed ½ cup fresh cilantro
½ cup scallions, rough chopped
2 14.5 ounce cans chickpeas  rinsed and drained-reserving at least 2 TBS of the liquid
1 cup rolled oats (I used flaxseed meal for allergies, which worked nicely!)
2 ½ TBS fresh lemon juice
2 tsp ground cumin
1 tsp ground turmeric
1 ½ tsp ground coriander
1 tsp salt (I would leave this out, as it made it too salty)
¼ tsp pepper
Optional: red pepper flakes for heat 

Instructions: 
Using your food processor, chop garlic, parsley, cilantro and scallions until fine.

Add in everything else, and process, but be careful not to over process into a paste. It's good for their to be texture differences, but yet you want it to be able to hold patty forms. If it's too dry, add in a little bit of the reserved chickpea liquid.

Transfer the mixture into a bowl and refrigerate for 30 minutes.

Heat a nonstick skillet on medium-high until hot, and form patties while you wait. You can either dry fry them until crispy, or use a little bit of EVOO. Place patties into the pan and cook for about 5 minutes per side, until browned.

Notes: Veggie burgers can be served immediately or refrigerated for up to a week. Simply reheat them in a pan, a toaster or a microwave before serving.

Alex and I thought these tasted best when you added a little more crunch/texture to them. Serve with cucumbers, lettuce, Israeli salad, or any other toppings that you enjoy!

Tahini Sauce 
Ingredients:
¼ cup tahini
2 Tbsp fresh squeezed lemon juice
2 garlic cloves, pressed
2 Tbsp water
Dash of salt (optional)

Instructions: 
Combine everything in a bowl and mix well. Store in the fridge until ready to serve. 

April 16, 2014

Taste the rainbow


I love this dish, not only because it's easy and delicious, but it's also so dang pretty. I love all the bright colors from the carrots, kale, curry, and turmeric. The flavors are a bit sweet, a bit sour and a little bit spicy, and it's a great side dish for chicken or fish.
 
This one is SED friendly, and now it's also Kosher for Passover friendly! Alex and I love it, and I've made this about 6 times in the past few months. As long as you have the quinoa pre-cooked and ready to go, it will take about 15 minutes to throw it all together. Normally, it calls for almonds, but I was all out, so I used cashews. They got a little too soft and lost their crunch, so stick with almonds when you make this. And you should make this! Look how pretty it is!
 
Moroccan Quinoa Pilaf
adapted from Nourishing Meals
Ingredients:
2 to 4 tablespoons extra virgin olive oil
1 medium onion, diced
4 carrots, sliced into rounds
1 cup raw almonds, chopped
½ cup currants or raisins
1 ½ to 2 teaspoons mild curry powder
½ teaspoon turmeric
½ teaspoon ground cardamom (I never have this, so I just leave it out)
4 cups chopped kale
4 to 5 cups cooked and cooled quinoa
1 small lemon, juiced

Instructions:
Heat a large over medium heat. Add olive oil, then add the chopped onions. Sauté onions for 4 to 5 minutes. Then add the sliced carrots and sauté for about 10 minutes more. Keep the heat at a medium temp to allow the onions to cook but not brown.
 
Add the almonds, raisins, spices, and salt and sauté 5 minutes more. Add the kale. Sauté about 5 minutes, or until kale is tender. Then add cooked quinoa and stir together over low heat. Add a few tablespoons of water if the pilaf seems dry. An extra tablespoon of oil will also help prevent the quinoa from sticking to the pan.

Remove from heat and add the juice of the lemon. Stir together, taste, and adjust salt and seasonings if needed.
 

April 7, 2014

Cooking with Gwyneth

 
Me and Gwyneth Paltrow are total BFFs. Okay, not really at all, but I did technically have her over for dinner the other night. This recipe is from her blog, which I had never heard of until I started my elimination diet. Apparently good ol' Gwynnie likes to eat clean and the majority of her recipes are Standard Elimination Diet (SED) friendly.
 
This recipe is one that I will keep in our rotation long after this diet is over. It's incredibly easy, delicious, filling and even the 3 year old likes it. Well, he picks out the kale, but I'll take what I can get. Alex wraps this up in corn tortillas, and I just eat it plain. We both like to top it with diced avocado, but I imagine it would also taste good with some sour cream or tomatoes. I recommend doubling the recipe so that you have more than enough for lunch the next day.
 
Sweet Potato, Black Bean and Kale Skillet
adapted from Goop

Ingredients:
2 sweet potatoes, peeled (I like to leave the peel on)
1 can black beans
2 hearty handfuls kale, torn into bite-size pieces
1 lime
olive oil
pinch of sumac (I omitted)
pinch of cumin
sea salt
freshly ground pepper

Instructions:
Dice the sweet potatoes into small/medium chunks.

Place large sauté pan over medium high heat and drizzle with olive oil. Add sweet potatoes, sumac(if using) and cumin to pan and cook for a minute until they begin to brown, stirring throughout to coat. Cover after a minute, bring the heat down to medium and let cook for about 5-8 minutes, stirring once or twice, until they’ve softened up.

Add black beans. Stir to mix. Add kale, season with salt and pepper, mix and cover. Let cook for 2-3 minutes, uncover and stir. (It will most likely be a bit too dry at this point, so drizzle over more olive oil.) Cook for another minute or so until kale is cooked to your liking. Squeeze the lime juice over top and toss gently to coat.

Serve with diced avocado, warm tortillas or any other topping you desire.

April 1, 2014

Elimination Creativity


Some of the meals I've made for the Elimination Diet have actually been so delicious (and easy!) that I will keep them in our meal rotation, even after I'm off this blasted diet. This salmon dinner is definitely one of them. I will admit that our grocery budget has gone up since I started this diet, because unfortunately cleaner, healthier, and fresher foods cost more. We are still cautious about how much we spend, but it's unavoidable in some ways. 

This diet has also forced me to be much more creative in the kitchen, which is fun. Now that I have a good grasp of what I can/can't eat, I am able to improvise some meals, either by altering recipes or gathering what I can find in the pantry. This recipe is a collection of a few different ones I've made in the past. It's fast and easy because the salmon cooks very quickly, and you can throw together the avocado and cucumber salad while it's roasting.

Skillet Salmon with Avocado Cucumber Salad
Ingredients: 
2-4 salmon fillets, skin removed
2 TBS olive oil 
2 ripe avocados, pitted and diced
1 large cucumber, de-seeded and diced
Lemon 

Instructions: 
Pre-heat the oven to 450

Lay the salmon on a flat surface and generously salt/pepper each side of the fillets. Put the olive oil in an oven-proof skillet (if the handle is not oven-proof, you can wrap it in foil), and bring it up to high heat. When the oil is almost smoking, place the salmon fillets in and let them sear for about 3-4 minutes so they form a nice crust. 

After, flip the fillets over carefully, and place the skillet into the pre-heated oven, until the fish cooks through, about 7-8 minutes (depending on the thickness). While it's cooking, combine the diced avocado and cucumber in a bowl, and season with salt, pepper and lemon juice to taste. 

When the fish is done, squeeze more lemon over the top and serve immediately.


September 5, 2013

Raisin Challah and Braiding Tips


L'shana Tova Umetukah! A happy and sweet new year!
 
On Rosh Hashana, the Jewish New Year, we eat a lot of round and sweet foods. The round symbolizes the cycle of a year, and the sweet is for your sweet year. One of my favorite traditional dishes is a round raisin challah. I've made challah before, but never attempted a round one. It seemed really intimidating!
 
However, I found a great recipe and tips from The Shiksa in the Kitchen, via Bon Appetite online. The Shiksa is a great blog for Jewish/Kosher recipes and food history (and let's not forget that Bubbie Ruth's Mandel Bread won an honorable mention in her recipe competition!). This article gave a great suggestion for round challah, which was creating a chain of dough links in a circle and letting it bake into a full round. I love the symbolism and the result!
 
I made the challah in advance, and then wrapped the fully baked and cooled rounds in foil and plastic wrap to freeze. When it was time to serve, I unwrapped and let them come to room temperature over 6 hours. Then I re-wrapped them in foil and popped them into a 250 degree oven for about 20 minutes. They tasted great!
 
Challah
Adapted from The Shiksa in the Kitchen
 
This will make 1 large braided challah or 2 smaller round challot
 
Ingredients:
Dough
1 1/2 cups lukewarm water, divided
1 packet active dry yeast
1 teaspoon sugar
1 egg
3 egg yolks
1/3 cup honey
2 tablespoons canola oil
2 teaspoons salt
4 1/2 to 6 cups all-purpose baking flour

Egg Wash
1 egg
1 tablespoon cold water
1/2 teaspoon salt

optional
1 1/2 cups raisins (for Rosh Hashana)
Sesame seeds or poppy seeds

Instructions:
Pour 1/4 cup of the lukewarm water (about 110 degrees F) into a large mixing bowl. Add 1 packet of active dry yeast and 1 tsp of sugar to the bowl, stir to dissolve. Wait 10 minutes. The yeast should have activated, meaning it will look expanded and foamy. Add remaining 1 1/4 cup lukewarm water to the bowl along with the egg and egg yolks, honey, canola oil and salt; whisk till blended.

Begin stirring the flour into the bowl by half-cupfuls. When mixture becomes too thick to stir, use your hands to knead. I added in about 3.5 cups and mixed it with the paddle attachment on my stand mixer. Then I slowly started to use the dough hook with an additional 1.5 cups. Continue to add flour and knead the dough until it’s smooth and elastic, not sticky. The amount of flour you will need to achieve this texture varies; only add flour until the dough feels pliable and “right.” If you plan to add raisins to the challah, incorporate them into the dough as you knead.

Preheat your oven to 250. Once it reaches temperature, turn it off, but don't open the oven yet. Remove the dough from your mixing bowl and wash out the bowl. Grease the bowl with canola oil. Push the dough back into the bottom of the bowl, then flip it over so that both sides are slightly moistened by the oil. Cover the bowl with foil, then place it on the top rack of your oven. After 1 hour, take the dough out and punch it down into the bowl several times to remove air pockets. Place it back inside the oven and let it rise for 1 hour longer.

Take the dough out of the oven. Flour a smooth surface like a cutting board. Punch the dough down into the bowl a few times, then turn the dough out onto the floured surface. Knead for a few minutes, adding flour as needed to keep the dough from feeling sticky.

Now your dough is ready to braid. See the "How to Make a Round Challah" link at the bottom of the page here.

After you’ve braided your challah, place it on a cookie sheet lined with parchment paper–one braid per cookie sheet. Prepare your egg wash by beating the egg, salt and water till smooth. Use a pastry brush to brush a thin layer of egg wash onto the visible surface of your challah. Reserve the leftover egg wash.

Cover the challah loosely with plastic wrap and let it rise 30 to 45 minutes longer. You’ll know the dough is ready to bake when you press your finger into the dough and the indentation stays, rather than bouncing back.

Remove the plastic wrap from the challah. Heat oven to 350 degrees F. The challah needs to bake for about 40 minutes total. First, bake your challah for 20 minutes. Take the challah out of the oven and touch up the center of the braid with another thin layer of egg wash (this area tends to expand during baking). Turn the cookie sheet around, so the opposite side is facing front, and put it back into the oven.

Bake the challah for about 20 minutes longer (bulkier shapes like round challahs might need more time in the oven). For this last part of the baking process, keep an eye on your bread–it may brown faster than it’s baking. When the challah is browned to your liking, take the tray out and tent it with foil, then place it back in the oven. Remove the foil for the last 2 minutes of baking time.

Take the challah out of the oven. At this point your house should smell delicious. You can test the bread for doneness by turning it over and tapping on the bottom of the loaf–if it makes a hollow sound, it’s done. Let challah cool on the baking sheet or a wire cooling rack before serving.

May 17, 2013

Mean Mommy?

This dairy free business is HARD. But, to make it even harder, I have now reduced my gluten intake, too...moving from gluten-lite to gluten-free over the next week. So far, no difference in my skin, but I'm ever hopeful. Sigh.
 
Curing a sweet tooth when you're off dairy and gluten is an exercise in frustration. "Oooooh...cookies! Oh, right..." (incidentally, Oreos do not contain any actual dairy. Gross or awesome? You decide). "Score! Froyo!....DAMMIT."
 
So where else do I turn, but Pinterest. This banana "ice cream" has been out there for a while, but I haven't ever been able to make it because we go through bananas at an alarming rate in this house. The kiddo would happily eat a banana for every meal if we let him, and for this dessert concoction, the bananas have to be just past edible-ripe. But our bananas never make it that far. So...mommy had to be sneaky and hide bananas. Mean? Maybe...but I got some dessert out of it at least. 
 
It's really really good! You can dress it up however you prefer, but I like it with just a bit of peanut butter and a few chocolate chips (non-dairy, of course).


Banana Ice Cream
Ingredients:
1-2 ripe bananas
Optional additions: peanut butter, nuts, chocolate chips
 
Instructions:
Slice bananas and lay them flat on a tray/plate to freeze slightly - just about an hour. Any longer, and they won't blend smoothly.
 
Put sliced frozen bananas into your food processer and blend until smooth. Blend in your optional additions and top with chocolate chips.
 
Keep it all to yourself and enjoy!


February 27, 2012

My Pinterest Kitchen


Have you seen my Pinterest kitchen? It's 50% healthy foods and 50% ooey-gooey cheesy or chocolatey fattening goodness. I probably won't ever make the "bad" 50%, but it's nice to look at them and have a little mental dessert every once in a while.

But, the other healthy recipes are great for inspiration when I've hit a meal planning wall. Take this samosa casserole. It's not something I ever would have considered, but after seeing it on a friend's board, I convinced myself to try it. We love Indian food, so I had all the spices on-hand already. The one thing I was lacking was a kosher pre-made roll out pie crust. However, Whole Foods to the rescue! I am going to keep a steady supply of this pie crust in my freezer. Love it!

Overall, we enjoyed this recipe, especially with the cucumber riata. I think, though, that I will make a few changes for the next time, such as increasing ALL the spices (also noted in recipe). The potatoes are really starchy, and they absorb spices really easily, so it takes a lot to make the flavors pop. It's very tasty, filling, and made for some great leftovers, too.

Indian Samosa Casserole
adapted from Vegetarian Times

Ingredients:
Crust (or use premade!)
1/2 cup all-purpose flour
1/2 cup whole-wheat pastry flour
1/4 tsp. salt
2 Tbs. vegetable oil
Filling
1 Tbs. black or yellow mustard seeds (2 TBS)
1 tsp. curry powder (2-3 tsp)
1 tsp. ground ginger (2-3 tsp)
1/2 tsp. ground cumin (2 tsp)
1/8 tsp. red pepper flakes, optional (1/2 tsp)
5 medium potatoes, peeled and quartered (decrease to 4. Don't need all 5)
1 1/2 tsp. vegetable oil
1 medium onion, diced
1 medium carrot, diced
3 cloves garlic, minced
1 cup frozen peas
1 cup low-sodium vegetable broth
2 tsp. agave nectar or sugar (skip, unneccessary)
2 Tbs. soymilk (or regular)

Instructions:
To make Crust:
Preheat oven to 375°F. Whisk together flours and salt in bowl. Stir in oil until clumps form. Add 6 to 10 Tbs. cold water, 1 Tbs. at a time, until dough holds together. Shape into ball, cover with damp towel, and set aside.

To make Filling:
Stir together mustard seeds, curry, ginger, cumin, and red pepper flakes, if using, in bowl; set aside.

Cook potatoes in boiling salted water 15 minutes, or until tender. Drain, return to pot, and mash, leaving small chunks.

Heat oil in skillet over medium heat. Add onion, carrot, and garlic, and sauté 5 minutes, or until carrot is tender. Move onion mixture to side of pan, and add mustard seed mixture in center. Toast 30 seconds. Stir in peas and broth. Fold onion mixture into potato mixture; stir in agave nectar. Season with salt and pepper, if desired. Spread Filling in 9-inch pie pan. Set aside.

Roll out Crust dough to 11-inch circle on floured work surface. Cover Filling with dough, pressing down to make sure no air pockets remain. Trim away excess dough, and crimp edges with fingers. Cut X in center to vent steam; brush with soymilk just before baking. Place pie on baking sheet, and bake 40 to 50 minutes, or until crust is golden. Let stand 5 minutes before serving.

Frozen cooking instructions: Preheat oven to 375°F. Place casserole on baking sheet, and bake 75 to 90 minutes, or until Filling bubbles and Crust is golden. Let stand 5 minutes before serving.

Cucumber Riata Ingredients:
1 8-oz. carton plain low-fat yogurt (Greek yogurt works nicely!)
1/2 cup finely chopped, seeded, peeled cucumber
1/4 cup minced green onions
2 Tbs. chopped fresh mint (or dried)
1/4 tsp. ground cumin

Instructions:
Combine everything together in a bowl, adjust seasonings to taste.

June 8, 2011

Leggo my egg yolk...


I enjoy a good egg salad, but I practically ate my weight in it during my entire pregnancy. I don't know what it was, but there was something so AMAZING about an egg salad sandwich. I'm surprised Eli didn't come out demanding the Egg Salad Cheese Toast sammie from Cafe Hon upon birth.

However, now that I'm back on the WW Wagon (dang stubborn last 5lbs of baby weight!), I needed something a little lower in calories and fat. Enter the Low Yolk Egg Salad from Skinny Taste! So easy to make and super delicious. I doctored it up with some celery and scallions, and it was perfect. I'm going to make egg salad this way from now on because honestly, you don't even miss the extra yolks.

Ingredients:
4 hard boiled eggs, peeled
4 tsp Hellman's light mayonnaise
1/2 tsp dijon mustard
2 tbsp chopped green scallions or chives
salt and fresh pepper to taste

Instructions:
Separate the yolks from the egg whites and discard 3 of the yolks. Chop eggs and combine with mayonnaise, dijon mustard, scallions, salt and pepper.

November 16, 2010

Pumpkin Gingerbread


Yup, it's as good as you think it's going to be. If a loaf of pumpkin bread and a loaf of gingerbread decided to have a baby...this would be their delicious lovechild. Fragrant, spicy, tender, and just the right amount of sweetness (at least in my version). The full recipe makes 2 loaves and I planned to bring one to work. Until I tasted it and decided that it was much better suited for my freezer to enjoy at a future date. What can I say? I'm selfish like that.

Make this. Now. You won't be sorry.

Pumpkin Gingerbread
adapted from allrecipes.com

Ingredients:
3 cups sugar (I used 1 cup white sugar and 1.5 cups brown)
1 cup vegetable oil (could use applesauce as a fat-free replacement. Won't alter taste at all!)
4 eggs
2/3 cup water
1 (15 ounce) can pumpkin puree
2 teaspoons ground ginger
1 teaspoon ground allspice
1 teaspoon ground cinnamon
1 teaspoon ground cloves
3 1/2 cups all-purpose flour
2 teaspoons baking soda
1 1/2 teaspoons salt
1/2 teaspoon baking powder

Instructions:
Preheat oven to 350 degrees F (175 degrees C). Lightly grease two 9x5 inch loaf pans.

In a large mixing, combine sugar, oil and eggs; beat until smooth. Add water and beat until well blended. Stir in pumpkin, ginger, allspice cinnamon, and clove.

In medium bowl, combine flour, soda, salt, and baking powder. Add dry ingredients to pumpkin mixture and blend just until all ingredients are mixed. Divide batter between prepared pans.
Bake in preheated oven until toothpick comes out clean, about 1 hour. If you're using dark pans, watch the crust. I had to tent mine with foil after about 50 minutes and they were still a little crispy on the bottom.

September 20, 2010

I love knishes 'cuz they're so delicious...


This is a family favorite recipe for the Jewish High Holidays, but they are especially tasty for breaking your fast over Yom Kippur. Creamy potatoes wrapped in butter puff pastry? Yes please!

It's a very simple recipe and you can fill the knishes with whatever your little heart desires. I think next time, I'll try meat knishes and/or broccoli in addition to potato! Oh, and please don't judge me for using instant potatoes. It's a heckuva lot easier to make them smooth and rollable if you don't have to mash them by hand.

But they are worth it! We had an absolute smorgasboard for Break Fast this year (as usual!) and everything disappeared from the table. I did catch the dog licking up puff pastry crumbs from the floor, so I know she approves of the knishes. Even the little kids liked them, which is a win in my book!

Ingredients:
1 package puff pastry, thawed
Potato Buds (or potatoes mashed by hand)
1 egg
1 onion, chopped
Salt and pepper, to taste
Olive oil

Instructions:
Preheat oven to 350. Thaw out the puff pastry according to instructions, and pinch the seams together so it's in one solid piece.

Sautee up the onions, set aside. Make the mashed potatoes, either by following box instructions or by hand. If you're doing it by hand, you might want to consider pureeing them so they aren't too lumpy. Think true "mashed" potatoes instead of the trendy "smashed" potatoes! Combine potatoes and onions together. Stir in the egg as a binder.

Place the puff pastry sheet on a lightly greased baking sheet, and lay out a line of filling on the end closest to you. Gently roll the pastry away from you, tucking up the edges as you go, so the filling won't spill out. It's a little messy. It helps to have a towel handy! Lay it seam side down, and repeat with the second pastry roll.

Brush the tops of the rolls with a little melted butter or egg wash, and score the top. I like to score it where I'll eventually end up cutting the completed knishes. This lets the steam out, and helps as a guide for serving portions.

Bake for about 25-30 minutes, until the pastry is golden brown and flaky. Allow to cool slightly before cutting into slices and then serve warm.

June 27, 2010

June Daring Bakers: Chocolate Pavlova with Chocolate "Mascarpone" Mousse


The June 2010 Daring Bakers’ challenge was hosted by Dawn of Doable and Delicious. Dawn challenged the Daring Bakers’ to make Chocolate Pavlovas and Chocolate Mascarpone Mousse. The challenge recipe is based on a recipe from the book Chocolate Epiphany by Francois Payard.

A pavlova is a meringue dessert, named after the Russian ballerina, Anna Pavolva. In Europe and America, it's usually a crispy piped or flat meringue, topped with cream and fruit. In Australia and New Zealand, it's a meringue cake, tall and crispy on the outside and marshmallowey on the inside.

This one sounds like a chocolate mouthful, and it was! I decided to make this challenge extra challenging by removing all dairy from the recipe. I wanted to serve it on Father's Day, and we were having chicken for dinner. Also, my father-in-law tries not to eat too much dairy nowadays, so I scoured the internew for vegan mascarpone recipes. I ended up using a combination of the recipes I found and mixed it with the Daring Bakers mousse recipe. The result? AH.MAZ.ING.

The mousse was rich, thick and deeply chocolatey...you couldn't even tell it was non-dairy. The chocolate pavlova was light and crispy, yet still rich and delicious. Topped with strawberries, well, this was a winner. My father-in-law said it was one of the best desserts I've made, and he loves a lot of my baked goods!

Chocolate Pavolva with Chocolate "Mascarpone" Mousse

Recipe 1
Chocolate Meringue (for the chocolate Pavlova):
3 large egg whites
½ cup plus 1 tbsp (110 grams) white granulated sugar
¼ cup (30 grams) confectioner’s (icing) sugar
1/3 cup (30 grams) cocoa powder

Instructions:
1.Place a rack in the center of the oven and preheat to 200º F (95º C) degrees. Line two baking sheets with silpat or parchment and set aside.

2.Put the egg whites in a bowl and whip until soft peaks form. Increase speed to high and gradually add granulated sugar about 1 tbsp at a time until stiff peaks form. (The whites should be firm but moist.)

3.Sift the confectioner’s sugar and cocoa powder over the egg whites and fold the dry ingredients into the white. (This looks like it will not happen. Fold gently and it will eventually come together.)

4.Fill a pastry bag with the meringue. Pipe the meringue into whatever shapes you desire. Alternatively, you could just free form your shapes and level them a bit with the back of a spoon.

5.Bake for 2-3 hours until the meringues become dry and crisp. Cool and store in an airtight container for up to 3 days.

Recipe 2
Chocolate Mascarpone Mousse (original DB recipe, dairy)
1 ½ cups (355 mls) heavy cream (cream with a milk fat content of between 36 and 40 percent)
grated zest of 1 average sized lemon
9 ounces (255 grams) 72% chocolate, chopped
1 2/3 cups (390 mls) mascarpone
pinch of nutmeg
2 tbsp (30 mls) Grand Marnier (or orange juice)

Instructions:
1.Put ½ cup (120 mls) of the heavy cream and the lemon zest in a saucepan over medium high heat. Once warm, add the chocolate and whisk until melted and smooth. Transfer the mixture to a bowl and let sit at room temperature until cool.

2.Place the mascarpone, the remaining cup of cream and nutmeg in a bowl. Whip on low for a minute until the mascarpone is loose. Add the Grand Marnier and whip on medium speed until it holds soft peaks. (DO NOT OVERBEAT AS THE MASCARPONE WILL BREAK.)

3.Mix about ¼ of the mascarpone mixture into the chocolate to lighten. Fold in the remaining mascarpone until well incorporated. Fill a pastry bag with the mousse. Again, you could just free form mousse on top of the pavlova.

My Recipe - Vegan Mascarpone
this recipe was very much "to taste." I used the base of the recipe I found online, and tweaked it with the DB recipe, using chocolate, powdered sugar, and vanilla extract until I liked the taste.
8 oz Soy Cream Cheese (I used toffuti's vegan cream cheese)
1/4 cup soy sour cream (I used toffuti's vegan sour cream)
1/3-1/2 cup powdered sugar (do this to taste)
9-10 oz. non-dairy (pareve) chocolate chips/chunks
1/2 cup Silk non-dairy creamer

1. Heat the creamer on the stove, and once it's warm, stir in chocolate. Whisk until smooth. Set aside in a bowl and allow to cool to room temperature.

2. Beat soy cream cheese, sour cream and powdered sugar together.

3. Fold in cooled chocolate. It may seem slightly runny at this point. Chill in the fridge for 2-3 hours until it's firm. Stealing spoonfuls to "taste test" is highly encouraged.

Recipe 3
Mascarpone Cream (for drizzling):
1 recipe crème anglaise
½ cup (120 mls) mascarpone
2 tbsp (30 mls) Sambucca (optional)
½ cup (120 mls) heavy cream

Instructions:
1.Prepare the crème anglaise. Slowly whisk in the mascarpone and the Sambucca and let the mixture cool. Put the cream in a bowl and beat with electric mixer until very soft peaks are formed. Fold the cream into the mascarpone mixture.

Recipe 4:
Crème Anglaise (a component of the Mascarpone Cream above):
1 cup (235 mls) whole milk
1 cup (235 mls) heavy cream
1 vanilla bean, split or 1 tsp pure vanilla extract
6 large egg yolks
6 tbsp (75 grams) sugar

Instructions:
1.In a bowl, whisk together the egg yolks and sugar until the mixture turns pale yellow.

2.Combine the milk, cream and vanilla in a saucepan over medium high heat, bringing the mixture to a boil. Take off the heat.

3.Pour about ½ cup of the hot liquid into the yolk mixture, whisking constantly to keep from making scrambled eggs. Pour the yolk mixture into the pan with the remaining cream mixture and put the heat back on medium. Stir constantly with a wooden spoon until the mixture thickens enough to lightly coat the back of a wooden spoon. DO NOT OVERCOOK.

4.Remove the mixture from the heat and strain it through a fine mesh sieve into a bowl. Cover and refrigerate until the mixture is thoroughly chilled, about 2 hours or overnight.

Pavolova Assembly:
Pipe or spoon the mousse onto the pavlovas and drizzle with the mascarpone cream over the top. Dust with confectioner’s sugar and fresh fruit if desired.

April 6, 2010

Curried Egg Salad


While this technically is a recipe for Passover, it's good enough to be made year round. We had quite a few leftover eggs from my baking adventures, so I decided to try an old-fashioned egg salad. However, whilst perusing recipes, I stumbled upon a Curried Egg Salad that made my mouth water. How could I not try it? I'm so glad I did, because it's delicious. Tangy, spicy, sweet, creamy, and crunchy all at once.

It was a great break from heavy brisket and kugel - perfect for a light refreshing lunch outside in the sunshine!

Curried Egg Salad
adapted from Gourmet Magazine, 1991

Ingredients:
1/4 cup bottled mayonnaise (could probably use even less and it would be just as good)
3/4 tsp curry powder
1/8 tsp celery salt
3 to 4 drops of Tabasco, or to taste
3/4 tsp ground cumin
1 tsp Dijon-style mustard
1 TBS fresh lemon juice, or to taste
1.5 TBS bottled mango chutney, chopped
6 hard-boiled large eggs, chopped
1/4 cup finely chopped celery
3 scallions, chopped

Instructions:
In a bowl stir together the mayonnaise, the curry powder, the celery salt, the Tabasco, the cumin, the mustard, the lemon juice, and the chutney. Stir in the eggs, the celery, and the scallions and season the salad with salt and pepper.

April 1, 2010

Passover Recipes: Salmon & Tilapia Cakes and Cauliflower Popcorn

Continuing with our Passover recipe listing, we have a great gefilte fish alternative. My mother-in-law picked this recipe and I'm so glad she did! The Salmon and Tilapia Cakes were supposed to be Salmon and Whitefish Cakes, but we just used what we had. I don't think there would have been that much of a flavor difference if we had used pike (whitefish) anyways! Be generous with the seasoning on this one, as the cakes themselves can be a little bland without salt or the sauce. However, they are fresh-tasting and light, a great compliment to a seder and delicious as a cold lunch the next day!

Salmon & Tilapia Cakes with Horseradish Cucumber Sauce
adapted from Epicurious.com


Ingredients:
Sauce:
1 cup finely chopped unpeeled cucumber
3/4 cup mayonnaise
3 tablespoons prepared white horseradish
2 tablespoons finely chopped fresh parsley
1 tablespoon finely chopped fresh chives

Fish cakes:
3 tablespoons olive oil plus more for frying fish cakes
3 medium carrots, peeled, finely chopped
1 2/3 cups finely chopped leeks (white and pale green parts only)
2 large eggs
6 tablespoons unsalted matzo meal
1 3/4 teaspoons coarse kosher salt
3/4 teaspoon ground white pepper
18 ounces skinless whitefish fillets, cut into 1-inch cubes
1 9-ounce skinless salmon fillet, cut into 1-inch cubes
Lemon wedges
Fresh parsley sprigs

Instructions:
For sauce:
Stir cucumber, mayonnaise, horseradish, parsley, and chives in medium bowl to blend. Season sauce to taste with salt and pepper. DO AHEAD: Sauce can be made 1 day ahead. Cover and refrigerate.

For fish cakes:
Line large rimmed baking sheet with plastic wrap. Heat 3 tablespoons oil in heavy large skillet over medium heat. Add carrots and leeks. Saut&#;233 until soft but not brown, about 15 minutes. Cool in skillet.

Beat eggs, matzo meal, coarse salt, and white pepper in large bowl to blend. Stir in carrot mixture. Place whitefish and salmon cubes in processor. Using on/off turns, chop fish to coarse paste (small pieces of fish will remain). Stir fish into matzo meal mixture.

Using wet hands and about 1/3 cup for each, shape fish mixture into sixteen 1/2-inch-thick cakes. Arrange on prepared baking sheet. DO AHEAD: Can be made 1 day ahead. Cover with plastic and chill.

Add enough oil to 2 heavy large skillets to coat bottom. Heat oil over medium-high heat. Add 8 fish cakes to each skillet. Sauté until golden and cooked through, about 3 minutes per side. DO AHEAD: Can be made 2 hours ahead. Transfer to another baking sheet, cover, and refrigerate. Rewarm uncovered in 350°F oven 10 minutes.

Arrange 2 fish cakes on each plate. Spoon sauce over or alongside. Garnish with lemon wedges and parsley.


Cauliflower Popcorn
adapted from Kosher by Design Entertains


This is a great vegetable side dish! It's called "popcorn" because of the color and the fact that you just want to keep sneaking little pieces into your mouth all night long. Very easy to make, this is a Shabbat dinner favorite amongst the "Kosher by Design" cookbook fiends. You know who you are!

Ingredients:
2 heads cauliflower, cut head into medium sized florets and discard stems
1 tsp salt
2 tsp sugar
1/4 tsp onion powder
1/4 tsp garlic powder
1/2 tsp paprika
1/4 - 1/2 tsp tumeric
6 - 8 TBS olive oil

Instructions:
Preheat oven to 450 and line a jelly roll pan or baking sheet with parchment paper.
In a very large bowl, combine the salt, sugar, spices and oil. Add cauliflower florets and toss to evenly coat.
Place in a single layer on the prepared sheet and roast, uncovered, for 30-35 minutes until the largest piece can be pierced with a fork. If the tops are starting to get too brown, toss the cauliflower during the baking process.

March 17, 2010

Spaghetti Squash...Tastes Great, Less Filling

The Flying Spaghetti Monster?

Spaghetti squash is one of those things that I heard about when I tried the South Beach Diet a few years ago. It was 5 weeks before our wedding and the dress was a *tad* snug. Just a little bit. Just enough to throw me into the total bridezilla panic of "OHMYGOD IT DOESN'T FIT!!!! EVERYTHING WILL BE RUINED!!!" Poor Alex. He watched his normally calm and centered Beth turn into a raving calorie and carb counting lunatic. Well, I lost about 5 lbs before the wedding, the dress fit just fine and all was well. Then, I immediately gained it all back (um...and then some) as I re-embraced my love of carbs after the wedding.

To this day, I pretty much disregard everything I learned from the SBD, except for a few recipes. Spaghetti squash is one of them. When we first tried to make it, we didn't cook it long enough and it was tough and chewy. Ick. I avoided it, figuring that it was just one of those things I was destined to do incorrectly, like brew coffee. Yes, folks, I can bake French Macarons and make my own cannoli, but I can't, for the everloving life of me, brew a decent pot of coffee. And now you know my dirty little secret.

However, I squashed (ha!) that myth last night. We roasted the squash at 375, in an inch of water, for 35 minutes and then tossed it up with tomatoes, olives, capers, onions, garlic and some feta. Delicious, if I do say so myself. Now if I could just work up the courage to try coffee again...

Spaghetti Squash
adapted from All Recipes

Ingredients:
1 spaghetti squash, halved lengthwise and seeded
2 tablespoons vegetable oil
1 onion, chopped
1 clove garlic, minced
1 1/2 cups chopped tomatoes
3/4 cup crumbled feta cheese
3 TBS sliced black olives (we like olives, so increased it to 1 cup)
2 TBS chopped fresh basil (didn't have. used dried)

Instructions:
Preheat oven to 375 degrees F (175 degrees C). Lightly grease a baking sheet.
Place spaghetti squash cut sides down on the prepared baking sheet, and bake 30 minutes in the preheated oven, or until a sharp knife can be inserted with only a little resistance. Remove squash from oven, and set aside to cool enough to be easily handled.


Meanwhile, heat oil in a skillet over medium heat. Saute onion in oil until tender. Add garlic, and saute for 2 to 3 minutes. Stir in the tomatoes, and cook only until tomatoes are warm.

Use a large fork to scoop the stringy pulp from the squash, and place in a medium bowl. Toss with the sauteed vegetables, feta cheese, olives, and basil. Serve warm.

March 1, 2010

Spicy Black Beans and Spinach with Dumplings

I would just like to state, again, that I hate using a cell phone camera. New camera to be purchased
POST HASTE.


Alex and I love Chef Rick Bayless. He just seems like such a mensch...who makes delicious Mexican food. Menschican? Anyways, when I saw this recipe posted on another blog and learned that it was a Rick Bayless original, well...I was sold.

We love spicy foods, especially with the addition of chipotle peppers for that smoky touch. The only mistake I made (and okay, it was a pretty big one) was that I purchased corn meal instead of masa for the dumplings. I don't know why I did it, when they were both clearly labeled, but that's what happens sometimes.

So my dumplings? Not so good. Spicy black beans and spinach? Amazing!

Spicy Black Beans and Spinach with Dumplings
adapted from Branny Boils Over, from Rick Bayless's Mexico One Plate at a Time

2 cans of black beans, drained and rinsed
1 28-oz can of diced tomatoes
2 onion, sliced
2 garlic cloves, peeled
2 canned chili pepper in adobo, seeds removed
3-4 cups roughly chopped, destemmed spinach

Dumplings:
1 cup masa
1/2 cup + 2T hot water
1/8 tsp baking powder

Instructions:
Sautee the onion in a nonstick pan until soft, then add minced garlic and cook 3-4 minutes. Puree half of the diced tomatoes with the chipolte pepper in a blender. Along with the black beans, add mixture to the garlic and onions. Add the additional can of tomatoes and cook over low heat 10-15 minutes. Just before serving, stir in spinach to wilt.

While beans simmer, combine masa with hot water and baking powder. The dough should be only slightly crumbly and come together easily. Adjust masa or water as needed to reach that consistency. Roll masa into marble sized dumplings and place a dimple in one side with your thumb. Bring a salted pot of water to a boil and cook masa dumplings in water – placing them in a few at a time and removing them once they float. Keep warm in a bowl covered with plastic wrap until ready to serve.

Just before serving, add dumplings to beans and stir carefully to avoid breaking the dumplings

February 22, 2010

Asian Dumpling Soup


I think I've gotten pretty adept at one-handed cooking over the past week. I have trouble opening jars and washing dishes (heh!), but I'm okay with chopping, mixing (left-handed) and a bunch of other things. Not quite up to kneading, but I'll get there. I took the wrist brace off after a week, and immediately over-used it by cleaning the house. So...it's back on. And Alex only said "I told you so" once. Under his breath, bless his heart.

Last night's dinner was a wonderful find in my favorite magazine, Real Simple. Alex and I have been on a vegetarian dumpling kick for the past few weeks and I picked up a bag of frozen Thai Dumplings from Trader Joes with the intention of just serving them plain one day as a snack. However, this soup is a much better use of these yummy guys. I would eventually love to make my own dumplings, but I'm not quite up to that challenge yet. Hmmmm...maybe that's what I'll pick for my round of Daring Bakers?

This soup is a great one-pot recipe, super easy to do in about 25 minutes. Filling, yet light, with great Asian flavors from the ginger, soy sauce and scallions, and it's packed with good vegetables. The original recipe called for watercress, but I couldn't find it. I used baby spinach instead, which tasted just fine. The only change I would made next time is to either chop or grate the ginger. I didn't like biting into a mouthful to get a crunchy slice of ginger - it's pretty overwhelming!

Ingredients:
2 32-oz containers of low-sodium chicken broth (I used vegetable)
1 2-inch piece of ginger, peeled and sliced thin (or 1 inch, grated/minced fine)
1 16-oz package of frozen pot sticker dumplings or Japanese gyoza
2 carrots, halved and sliced
4-8 oz mushrooms, sliced
2 cups frozen shelled edamame
1 bunch watercress, stems removed, about 3 cups total
1 TBS low-sodium soy sauce
Kosher salt (optional)
4 scallions, sliced

Instructions:
In a large soup pot, bring broth and ginger to a boil. Add the dumplings and carrots, and simmer until just tender, 8-10 minutes.
Add the mushrooms and edamame, and simmer until heated through, about 2 minutes. Stir in watercress and soy sauce. Taste before adding the salt, and season if necessary. Ours didn't need any. Sprinkle with scallions before serving.

February 9, 2010

Oh the weather outside is frightful...

Did you know that Maryland got b*tch slapped by Mother Nature this weekend? If you missed out, let me share some pictures from some friends facebook pages:


That was a car. I'm not sure what it is now (taken by my student, Megan)


Taken by my sister-in-law. I'm jealous of her camera.


My friend Sam. Ain't she adorable?


So...as you can see, we spent our whole weekend either huddled on the couch or wielding the mighty snow shovel. Before Blizzard 2010 hit, I ran to the grocery store to make sure that I had enough flour, butter, eggs and sugar to get me through the weekend. This, in hindsight, was the worst idea ever. I spent 5 minutes gathering my groceries and then another 45 minutes waiting in line, surrounded by people who were in sheer panic. Sigh.

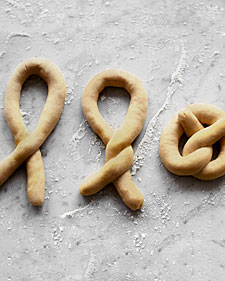
What else is there to do on a snowy weekend but bake, right? I decided to try my hand at homemade pretzels, since I haven't had the best luck with yeast-related dishes yet. This is a Martha recipe, and is pretty simple overall. The worst part was rolling and twisting all 32 mini-pretzels, but it wasn't like I had anything else to do!

They tasted great, but not exactly like the kind you get at the ballpark. I think that there should be more baking soda in the water bath, which would help give them more of a shiny crust. I will definitely make these again!

Soft Pretzels
adapted from Martha Stewart Living


Ingredients:
2 cups warm water, 100 degrees to 110 degrees
1 tablespoon sugar
1 teaspoon active dry yeast
5 to 6 cups all-purpose flour, plus more for dusting
1 tablespoon salt
2 teaspoons canola oil
2 tablespoons baking soda
1 large egg
Coarse or pretzel salt
Vegetable-oil cooking spray

Instructions:
Pour warm water into bowl of electric mixer fitted with a dough hook. In a small bowl, combine water and sugar, and stir to dissolve sugar. Sprinkle with yeast, and let sit 10 minutes; yeast should be foamy.

Add 1 cup flour to yeast, and mix on low until combined. Add salt and 4 cups flour, and mix until combined, about 30 seconds. Beat on medium-low until dough pulls away from sides of bowl, about 1 1/2 minutes. Add 1/2 cup flour, and knead on low 1 minute more. If dough is still wet and sticky, add 1/2 cup more flour (this will depend on weather conditions); knead until combined, about 30 seconds. Transfer to a lightly floured board, and knead about 10 times, or until smooth.

Pour oil into a large bowl; swirl to coat sides. Transfer dough to bowl, turning dough to completely cover all sides. Cover with a kitchen towel, and leave in a warm spot for 1 hour, or until dough has doubled in size.

Heat oven to 450 degrees. Lightly spray two baking sheets with cooking spray. Set aside. Punch down dough to remove bubbles. Transfer to a lightly floured board. Knead once or twice, divide into 16 pieces (about 2 1/2 ounces each), and wrap in plastic.

Roll one piece of dough at a time into an 18-inch-long strip. Twist into pretzel shape; transfer to prepared baking sheet. Cover with a kitchen towel. Continue to form pretzels; 8 will fit on each sheet. Let pretzels rest until they rise slightly, about 15 minutes.

Meanwhile, fill large, shallow pot with 2 inches of water. Bring to a boil. Add baking soda. Reduce to a simmer; transfer 3 to 4 pretzels to water. Poach 1 minute. Use slotted spoon to transfer pretzels to baking sheet. Continue until all pretzels are poached.

Beat egg with 1 tablespoon water. Brush pretzels with egg glaze. Sprinkle with salt. Bake until golden brown, 12 to 15 minutes. Let cool on wire rack, or eat warm. Pretzels are best when eaten the same day, but will keep at room temperature, uncovered, for 2 days. Do not store in covered container or they will become soggy.
Here is Martha's pictorial on rolling & twisting. It's pretty self-explanatory:

December 15, 2009

TWD: Beth vs. the Volcano (cookies)

Okay, so making this week's TWD recipe did not give me a brain cloud and an overwhelming desire to jump into a volcano...but the name of the cookies reminded me of that great 90's classic:


If you haven't seen Joe vs. the Volcano, I highly recommend it. I also think that the natives of Waponi Woo would have liked these cookies.


The nuts (walnuts, almonds and pecans) make them all bumpy so that they look like little mountains. And then when you eat them, they sizzle and pop just a little bit - like a cookie pop rocks.

It's probably one of the easiest Dorie recipes we have done so far - toast nuts, mix with sugar, egg whites and espresso powder, bake. Eat. I will make these again for a quick cookie fix, but I'll double the espresso since most of it seemed to disappear after baking. Great choice, Macduff!

Stay tuned for next week's Dorie pick - chosen by ME! FINALLY!

August 7, 2009

Salmon in Foil

Summertime, and the livin' is easy. Well, okay, at least this dish is easy! And it works well when both Alex and I get home at 9PM on a weeknight or when I want to really impress people with some fancy cooking skillz. Oh yeah, I haz dem.

This is a family recipe that I can remember my parents making in a pinch. It works well with any kind of fish, but we happen to enjoy it with salmon. The sauce can also be altered to your own tastes, but I like to keep it simple!

Ingredients:
1-1.5 lb salmon fillet
aluminum foil squares (big enough to wrap around each piece of fish)
2 TBS olive oil
2 TBS lemon juice
2-3 tsp dijon mustard
Parsley flakes

Instructions:
Pre-heat the oven to 450.
Divide the fish into 4 serving sizes (or 2 for larger portions) and lay in the center of a foil square (skin side down). Turn up the edges slightly to form a makeshift bowl, so the liquid won't run out.
Whisk together the olive oil, lemon juice and mustard and pour equally over all the fish. If you run out, just make more.
Sprinkle the fish with parsley and then wrap up the foil. Fold over the long edges first and roll down, then the short edges, making sure it's well sealed.
Bake for 15-18 minutes, depending on how well done you like your fish. If you're serving this to a large group, it might be easier to remove the fish from each foil packet and then serve it.


Peekabo - where are you?

Found you! Now get in my belleh...

August 3, 2009

Spicy Garlic Greens

We all know that we need to eat our greens. But sometimes gooey and cheesy is much more appealing than dark and leafy (which, incidentally, makes it sound like you're about to eat a forest.) Because of that, I like to dress up my greens. Usually I use a cute little bow-tie or top hat, but in this case I went with garlic and red pepper flakes.

Alex's mom brought us a bag full of kale from her organic garden and I knew immediately what I wanted to do with it. Kale isn't something I used to try, but once we made this recipe, I was hooked. In its raw form, kale is pretty rough-looking and intimidating, but it's easily tamed if you know how to finesse it a little bit. I love this recipe because I love garlic. Raw, roasted, grilled, simmered, smeared, sauteed, baked, sliced, fried, mashed...you do it to garlic and I'll eat it. There's something addictive about the pungent and spicy taste that can change to sweet and mellow in the blink of an eye. There is a restaurant in SanFran that I hope to get to someday, called The Stinking Rose. That's my kind of place!

When you're cooking greens, always remember that they will release a lot of water and cook down to less than 1/3 of the original size. My pan started off looking like this:


And after about 5 minutes, it had cooked right down to this:

Remember that when you're thinking "There is now way this will all fit in my pan! It's too much."
Since I knew the kale would really shrink, I threw in a few big handfuls of baby spinach. This recipe can be used for any green leafy vegetable, but I find that spinach and/or kale work best. It's a great side for any protein you wish to serve, or you can whip up a big batch of this and mix it with pasta. C'mon...it's good for you!

Ingredients:
1 large bag of kale, stems removed and ripped into bite-sized pieces (or spinach)
1 clove garlic, finely chopped
1-3 tsp red pepper flakes, to taste
2 tsp olive oil

Instructions:
Heat olive oil in a large non-stick skillet and add garlic. Cook until fragrant, 1 minute or so, being careful not to let it brown. You want to flavor the oil in the pan, so make sure to stir the garlic around evenly.
Add the greens and continue to cook over medium-high heat, stirring occasionally. The greens will start to wilt almost immediately. Keep stirring until they reach your desired texture. Add in red pepper flakes and stir to combine. They add a lot of heat, so be sure you know your tolerance first!
Serve hot.